
For membership websites, it is important to keep exclusive access to paying members only. Invitation codes can help in building a close-knitted community and staying in control of who becomes a member of your website.
WordPress, by default, does not have this feature, but you can add this functionality to your registration forms using the Pie Register plugin.
What Pie Register Has to Offer for Invite Based Registrations?
Pie Register is a WordPress registration plugin that lets you build smart and secure registration forms, helping you keep your website content exclusive and spam-free.
The Invitation Codes feature of the plugin lowers the risk of spammers, bots, and fake registrations and strengthens the site’s security since only users who receive an invitation code can register.
The key features include:
- Protect your site’s privacy and prevent unwanted registrations.
- Quickly set multiple codes and invite codes.
- Add invite code usage limit.
- Track users by Invitation Tracking Dashboard Widget.
- Specify the Invitation Codes from the Field settings to allow registration on a particular form through these codes only.
- Auto-Generate codes. [Premium]
- Limit the code length. [Premium]
- Invite Through Email. [Premium]
- Set expiry dates. [Premium]
- Import invitation codes through CSV under Import/Export section. [Premium]
- Filter search tags for invitation codes (used, unused, expired, date created, and user role) [Premium]
- Export OR Bulk Export user data for invitation codes. [Premium]
- Assign a user role. [Premium]
- Let users invite other users on the website through raw codes, auto-generated codes, and invite through email. [Premium]
- Set limits to generate codes and email invites. [Premium]
- Allow specific users to invite by adding particular email addresses. [Premium]
- The admin can access and track user-generated codes through User Tracker. [Premium]
How to Use Invitation Codes Using Pie Register?
In this tutorial, we will explain how you can allow user registration by using the Invitation code features of Pie Register.
If you are new to Pie Register, you may want to learn how to create your first Registration Form using Pie Register.
1. Enable Invitation Codes
- First, we need to enable the invitation codes.
- In the dashboard’s menu, click on Pie Register > Invitation Codes
- Check Enable Invitation Codes checkbox to enable invitation-only registration.
- Click the Save Settings.

2. Create Invitation Codes
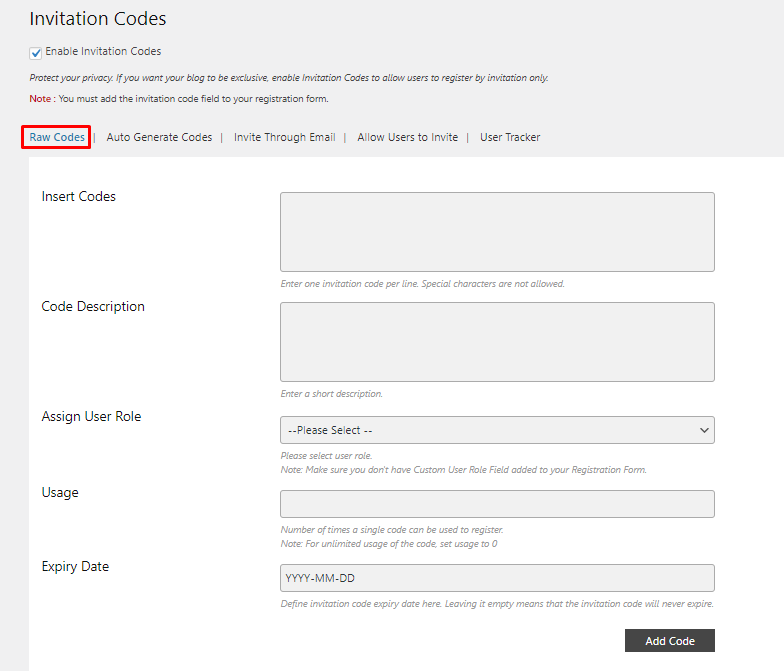
Raw Invitation Codes
Insert Codes: In this section, write down single or multiple invitation code/s. Each code should be on a separate line with no special characters allowed.
Code Description: You can add a little detail about the code for future reference.
Assign User Role: Here, you can select user roles based on your invitation codes. (For Premium Users)
Usage: Enter the number of times a single code can be used to register.
Expiry Date: If you are using the Premium version, you can set an expiry date for the code.
Click on the Add Code button to save the settings.
Auto-Generate Code (Premium)
If you want to create auto-generated codes, follow the steps mentioned below:
Go to the Auto Generate Codes tab.
Code Prefix: In this section, write down the code prefix. The prefix should contain a minimum of three characters.
Code Numbers: Define the desired number of codes you want to generate. The maximum is 10.
Code Length: Here, you can enter the length of the code. Code can be a minimum of 5 characters and a maximum of 10 characters long. (For Premium Users)
Code Description: You can add a short code description for future reference.
Usage section: Write the number of times a single code can be used to register.
Expiry Date: Set an expiry date for the code. (For Premium Users)
Click on the Add Code button to save the settings.

3. Invitation Through Email (Premium)
Go to the Invite through Email tab and fill in the following:
Registration Page: Choose a Registration page from the dropdown to redirect the users once they click on the invitational link in the email.
Select the Invitation Code.
Invite Users: Add an email address or addresses to invite the users manually or simply attach a CSV file to import the email addresses.
Click on the Send Invitation.

In the Invite through Email tab, you can customize the email template with a shortcode sent to the users for the invitation.

4. Allow Users To Invite (Premium)
The upgraded plugin of Pie Register allows users to invite other users on the website by generating raw and auto-generated codes. Check the box to enable the feature.

Next, the admin can select which users can generate codes.
- All users
- Particular user roles. (Can multi-select the options)
- Specific Users. (Mention email addresses)

Then select how the users can generate codes:
- Raw codes
- Auto-generated codes
Admin can allow the users to generate through both types.
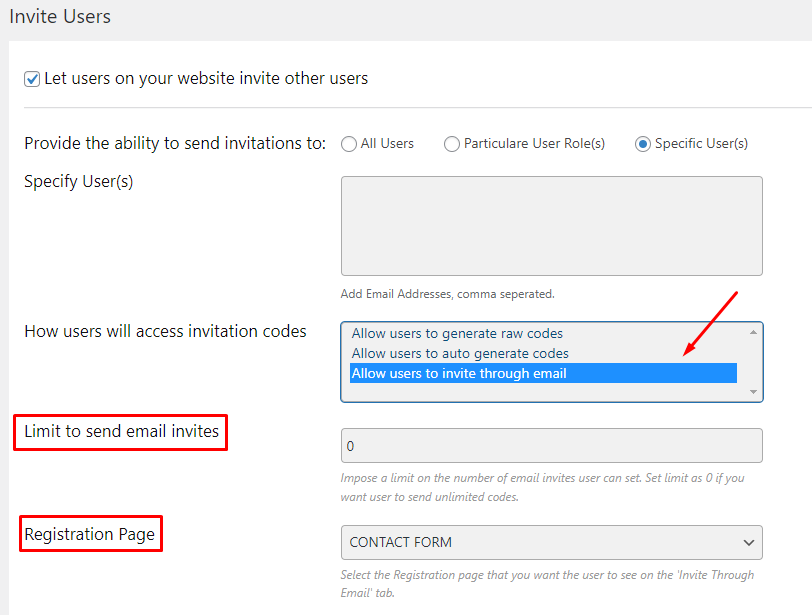
Next, limit the number of invitation codes a user can generate or send email invites to. For unlimited codes, opt for 0. Select a number for how many times a single code can be used. Set it to 0 for unlimited usage.
Save the settings.
5. User Tracker (Premium)
The admin can track the user-generated codes here.
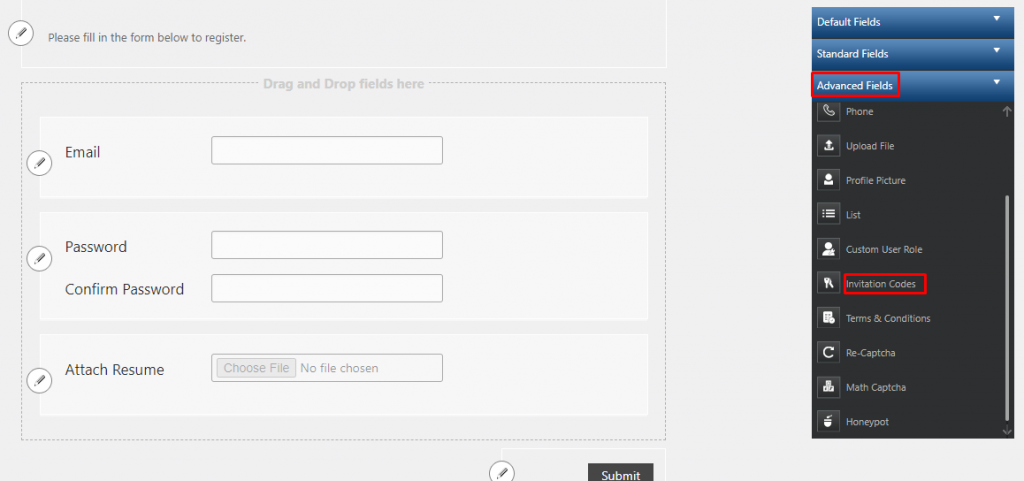
6. Add Invitation Code field to the Form
Next, we will add an Invitation Code field to the form.
Go to the sidebar; select Pie Register > Manage Forms. Here we will see a default form; we can edit or add new fields to the form.
From the right side, open Advanced Fields and click on the Invitation Code. The field will now be added to our form.
Click on the Save Settings button.
To change the properties of the Invitation Code field, we can click the Edit button on the left side of the field. Here we can change the label text, description and placeholder text, etc.
We can also specify the invitation codes in the Allowed Codes section to only allow registration through these codes. If left empty, all invitation codes would work.
By marking it required, we make it necessary for the user to fill in the field. To give a style, we can write a CSS class name. Here we can also write a validation message and choose options to show in the profile.

After completing all the changes, click the Save Settings button.
7. Managing Invitation Codes – Admin
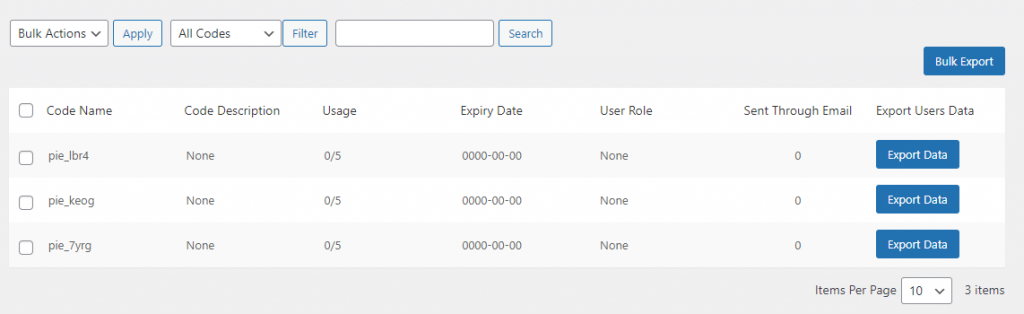
The admin can manage the invitation codes using the Code table feature.
Go to Pie Register>Invitation Codes and scroll down to find the Code Table.
From the Code table, you can:
- See the list of all admin-generated codes.
- Delete, activate, or deactivate them.
- Edit the code name, description, usage, and expiry date here.
- Export or Bulk Export user’s data
- Filter search tags for invitation codes including used, unused, expired, date created, and based on user-assigned role.

8. Managing Invitation Codes – Users
The users can view the user-generated invitation codes using the Code table feature.
Go to Pie Register>Invitation Codes and scroll down to find the Code Table.
From the Code table, the user can:
- View the list of their user-generated codes.
- Delete, activate, or deactivate them.
- Edit the code name, description, usage, and expiry dates.
- Export or Bulk Export user’s data registered using the user’s generated codes.
- Filter search tags for invitation codes including used, unused, expired, date created, and based on user-assigned role.
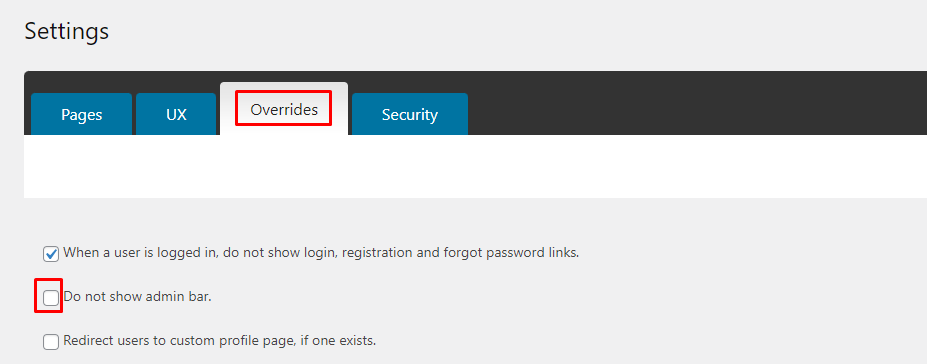
Note: The admin bar will only be visible to the user if the admin unchecks this box, as shown in the screenshot below. If the admin enables it, the user won’t be able to view the admin bar. The admin can uncheck the box from here: Pie Register>>Settings>>Overrides.
9. Invitation Tracking Board Widget
All the used codes can be tracked through the Invitation Tracking Board Widget on the Admin dashboard. It displays the number of users registered using a particular code at a glance.
![]()
Import Codes through CSV [Premium]
- On the left sidebar, select Pie Register > Import/Export
- Go to Invitation Codes
- Click on Choose File (CSV or JSON format)
- Click on Import

Did you know Pie Register’s Admin Helper Application helps you Verify, moderate, and send Invitation codes to the users on the go? Download Now
Conclusion
That’s it! We hope this article helped you learn how to use Invitation Codes with Pie Register. You can now create invitation codes, manage, share, and track them quickly to keep your website exclusive and spam-free.
Please let us know in the comments or Contact Us if you have any questions.